Budget Help
- Key Concepts
- Getting Started
- Work with Accounts
- Work with Envelopes
- Work with Income
- Record Transactions
- Work with Transactions
- Calendar
- Investments
- Calculators
- Import/Export/Sync
- Reports/Statistics
- Preferences
| Entering Data for Transactions |
| Reminders: Repeating Transactions |
| Rule Based Deposits |
| Setup Check Printing |
Record a Check, Debit, or ATM
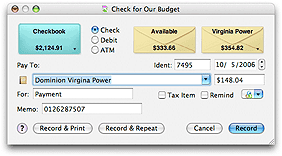
You can record a check from any envelope. Checks decrease the amount of money in a bank account and envelope. To record a check from more than one envelope at the same time see the split check, debit or ATM section. To record a check to pay off a credit card account, see paying off a credit card. To write a check select the envelope and use the Transaction > Check... menu command or click the CHECK toolbar button. The Check transaction window displays the bank account balance in the upper left, and the "Available" envelope and the selected envelope in the upper right. If you have more than one bank account defined see the section on multiple bank accounts. 
The button with the small currency symbols on it is the QUICK CONVERT popup menu. Click and hold on the button to select a currency conversion. The AMOUNT field will be multiplied to the correct amount in the selected currency. You can set up the quick convert menu and the rates used in the Currency Converter window. If there are not enough funds in the envelope to cover the amount of the check you will be prompted to transfer funds from the "Available" envelope. See the Automatic Transfer from Available topic for more details. The RECORD & PRINT button works the same as the RECORD button, but it also sends the check to the printer to be printed. See the Printing a check topic for more details. You can click the RECORD & REPEAT button to enter more checks or debits in the same envelope or use the little black arrow in the envelope box to select different envelopes. To set up a future check to the same place, turn on the REMIND checkbox. See the Reminders topic for more details. |