Split Checks, Debits, and ATMs
|
Note:The process is basically the same for a check, debit, or ATM transaction. For illustrative purposes we will use a check transaction. The difference between a check and debit transaction is that a debit does not have an IDENT field for a check number. The ATM transaction has neither an IDENT field nor a memo field.
|
You can split the amount of a check among multiple envelopes. This is useful when you purchase a number of items with a single check. For example, you may have purchased both groceries and drugs at the local supermarket and want to split the amount of each purchase in your "Grocery" and "Prescriptions" envelopes.
To split a transaction among multiple envelopes select the bank account and use the appropriate Transactions menu command. If you have more than one bank account defined see the Multiple Bank Accounts topic for more information.
|
Note: You can change the type of transacton by selecting the transaction type radio button.
|
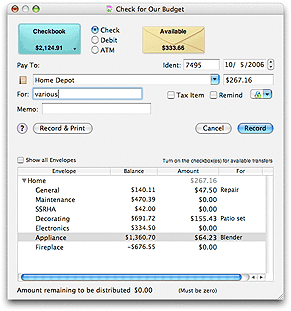
The split check transaction window displays a list of your envelopes. If you have made a previous split check that checks information and the envelopes used are displayed. To work with all the envelopes check the box for SHOW ALL ENVELOPES.
Enter the check payee in the PAY TO field Enter any information you placed on the check in the MEMO field (optional). The program places the next check number in the IDENT field and the date in the DATE field. You may change these. Also check the main Tax Item checkbox if the entire transaction is tax deductable. Check the box for each envelope in the last column if a portion of the split is tax deductable. Double click an amount in the table next to each envelope to enter amounts. Also enter data in the the FOR field (optional) for each envelope. As you enter amounts the total will be shown in the check area amount field.
Budget places the amount of the last transaction in the AMOUNT field or $0.00 if no transaction was found. If there is an amount in the AMOUNT field, as you enter amounts next to each envelope the amount left to be distributed is shown. If there is no amount in the AMOUNT field as you distribute amounts to your envelopes the AMOUNT field will show the total distributed. See the working with table amounts topic for more information.
The button with the small currency symbols on it is the QUICK CONVERT popup menu. Click and hold on the button to select a currency conversion. The AMOUNT field will be multiplied to the correct amount in the selected currency. You can set up the quick convert menu and the rates used in the Currency Converter window.
Once all the information is correct, click the RECORD button, or the RECORD AND PRINT button if you would also like to print the check on your printer.
|
Note: Available Transfer
A checkbox will be displayed in the last column if the amount of the check is greater than the amount in the envelope. Check the checkbox if you want funds to be transferred from the "Available" envelope to cover the check.
The checkbox in the header of the last column can be used to turn all the checkboxes on or off. See the Automatic Transfer from Available topic for more information.
|
|