Budget Help
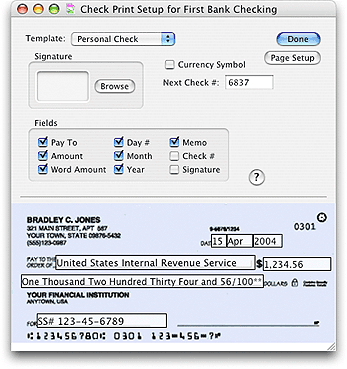
Print a Check or DebitChecks may be printed by selecting the check to print in the history window and clicking on the PRINT toolbar button. You may also print the check when you write it by clicking the RECORD & PRINT button instead of the RECORD button in the check transaction window. In order to print checks you must have a printer that is able to hold your bank checks. Most ink jet printers and some laser printers are adjustable to different size paper. Once you have verified that your printer can hold your checks, you must tell the program which fields to print and where to print them. Field defaults for standard sized checks are already set and may only need minor adjustments for your printer. To set up your checks for printing, first select a bank account on the main budget window, then use the Accounts > Check Print Setup... menu command to display the CHECK PRINT SETUP window. The window has default settings to print the payee, amount, for, memo, and date (day month year) for standard size US personal checks.
If you have not registered Budget, printed checks will be overwritten with a watermark that says "Unregistered". See the registration topic to learn more about registering Budget. 
The position of the field in the window is the location that the field will be printed on the check. Checking a field's checkbox places that field in the default position on the check. Clicking within a field rectangle allows you to drag the rectangle. Clicking on a knob of the rectangle allows you to adjust the size of that rectangle. Selecting the checkbox CURRENCY SYMBOL prints the local currency symbol with the amount. For fine adjustments you can use the arrow keys to move the selected field. To print, select a check in an envelope's history window and use the File > Print... menu command. We suggest that you print a few checks on plain paper to verify that the fields will be printed in the correct locations on your check. You can set the number of the next check in your checkbook here as well. To have Budget print your signature on your check you must have an image of your signature. Create a picture of your signature by using your scanner and the software provided with that to create an image file. From the check print setup window click the BROWSE button to navigate to your image file, or drag the file to the image well. Select the SIGNATURE checkbox and position the field on the check. |