Budget Help
Setting up ManuallyIf you want to use the Setup Assistant to get started, see the Setup Assistant help section. When you cancel the Setup Assistant, you see Budget's main window.
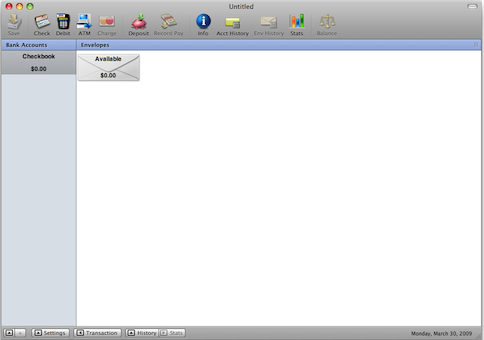
First: Create your bank accountsA bank account is your real-world checking account that you have at your bank that you want to track and manage with Budget. The main window already has a default checking account named "Checkbook". To change the name of the account, select the "Checkbook", and click the INFO button on the toolbar to get the ACCOUNT INFORMATION window. 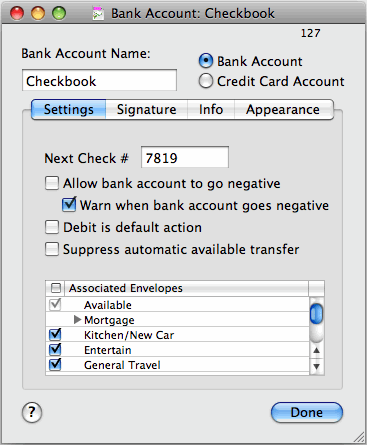
Change "Checkbook" to your bank account name and enter the next check number that you want to start tracking with Budget. Other account preferences can be set later after you finish getting started. Click DONE and you will see your bank account name instead of "Checkbook" on the main window. You can create multiple accounts in Budget, for example, an additional checking account, a savings account, or a credit card account. However, we suggest for now you just create one checking account to get started and create additional accounts later after you are familiar with the program. Also, before deciding to handle your credit card as a bank account, we suggest first reading Handling Credit Cards to determine if you really want to do that or use one of the less detailed, simpler methods. If you decide on the account method, see Getting Started Using Credit Cards for details on setting up the account. You can add, delete, or modify account information and options at any time. See the Working with Bank Accounts topic for more details. Second: Create your envelopesEnvelopes are used to hold portions of the money in your Account that you want to set aside for specific expenses. You may want to create an envelope for each bill, such as "Rent" or "Phone", and also create envelopes for discretionary expenses such as "Entertainment" or "Clothing". You can create as many envelopes as you like. To create your envelopes, use the Envelope > New Envelope... menu command, an ENVELOPE INFO window appears. Enter the ENVELOPE NAME, such as "Rent" or "Groceries". As this point, you can click on the APPEARANCE tab if you wish to select a color or add an icon to the envelope - or just wait till later. For now, we will simply enter the envelope name, and we will ignore the BUDGET, INFO, and OPTIONS settings until a later step. 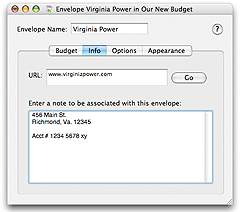
Close the window and you'll see your new envelope on the main window. Continue creating additional envelopes for your budget expenses, and they will all be displayed on the main window. You can add, delete or modify envelopes at any time. You can also group envelopes together (such as creating a "Utilities" group to hold "Gas", "Electric" and "Water" envelopes). See the grouping envelopes topic for more information. Third: Deposit your Account Balance and distribute it to your envelopesNow that you've named your checking account, and created envelopes, you will start your Budget file by recording a deposit of your current account balance and distributing all or portions of the money to your envelopes. The money that is currently in your checkbook is most likely needed to pay bills and expenses. You will now set aside that money in the appropriate envelopes. Think of it as catching up with the fact that the balance that is in your checking account would have been distributed to your envelopes if you had been using Budget all along. To deposit your account balance, without selecting any envelopes, click the DEPOSIT button on the toolbar, and the SPLIT DEPOSIT window will appear (see below). In the table in the middle of the window, you'll first see an envelope named "Available" and then a list of the envelopes you created. (The "Available" envelope is used to hold any money in your account that is not set aside for specific expenses in your other envelopes). 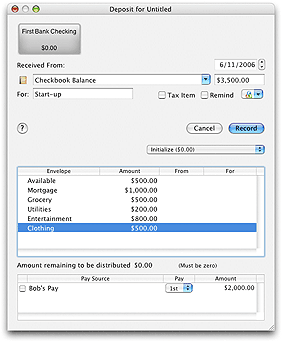
First fill in the top of the form with your starting balance information. In the amount column next to each envelope, enter the amount of your account balance that you want to place in that envelope. The total amount that you distribute to your envelopes (including the "Available" envelope) must equal your current account balance. If you do not want to set aside all your money into your expense envelopes, just put the remainder into the "Available" envelope.

You can modify amounts deposited to envelopes at any time by editing the transaction or transferring money to other envelopes.
Please read the About Income topic before completing the next two steps. Fourth: Setup your Pay SourcesSetting up your budget in advance and preallocating your future pay to your envelopes is what gives Budget it's full power to help you manage your budget. A budget consists of income and expenses, so the first thing to do is to define the amount and frequency of your income (called "pay sources" in Budget). Use the Accounts > Pay Source... menu command. Click the ADD button, and change "New Pay Source" to whatever you want to call your pay source (for example, "Bob's Pay""John's Pay" or just "John" ). 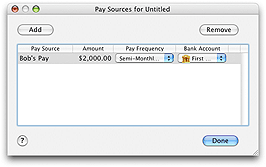
If you receive a pay check on a regular basis, enter the amount of the pay (or an average if the amount varies) and select the appropriate fixed frequency. If you receive pay of different amounts at various times, enter an average of each pay in the AMOUNT field. Now select the variable pay frequency that best matches how often you get paid each month. It is best to select the maximum number of pays you might receive in a month. If you have more than one bank account created in Budget, the last step is to select the bank account into which this pay is deposited. For this example you only created a single bank account so it will be the only one in the popup menu. You can add as many pay sources as you wish. When you are finished, click DONE. You can add, delete or modify pay sources at any time. Fifth: Create your Budget (Expenses)This is the "make your budget" step - you'll define the amount and frequency of your expenses. Use the Accounts > Pay Allocations... menu command. The PAY ALLOCATIONS window will appear. Click the EXPENSE AMOUNT tab if it's not already selected, and you will see a list of your envelopes down the left side. 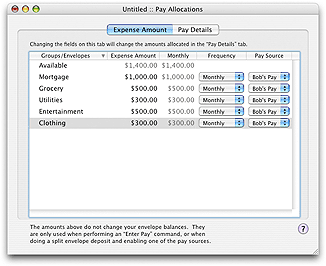
For each expense envelope, enter your expense amount, and choose the appropriate frequency from the FREQUENCY popup menu. Note that the MONTHLY column automatically computes a monthly amount for you regardless of the frequency you actually set for the expense. Next enter the pay source from which you want the funds allocated for this expense. For this example you only created a single bank account so it will be the only one in the popup menu. Most bills are due monthly, and have either a definite amount or you can compute an average amount. Insurance and other types of bills are due annually or semi-annually, so select the appropriate frequency. For discretionary expenses, you enter the target amount and frequency period that you desire. The bottom line is to have enough money in each envelope when the bill is due to make the payment, and to budget enough money for your discretionary expenses.
Notice that as you enter expense amounts, the amount shown next to the "Available" envelope changes to show the amount of money each month from the pay source(s) that is not yet allocated for expenses - that amount is available to allocate to expenses or to build up in the "Available" envelope. After you set your expense frequencies, Budget computes the amount that should be deducted from each pay source each time you get paid to meet your expense requirements. Click on the PAY DETAILS tab to see what Budget has computed to be allocated to your expense envelopes each time you get paid. 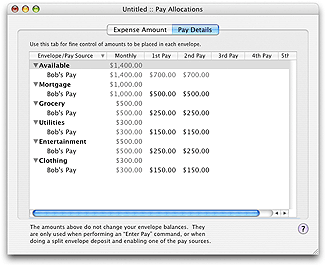
Don't agree with what Budget calculated? It is simple to change any amount by double clicking on it and entering a new amount.
You can add, delete, or modify your expense amounts or modify the pay details at any time. You can do this using either the Pay Allocation Table to work on more than one envelope (as we just did), or the Envelope Info Window to work on a single envelope. The ENVELOPE INFO window allows some additional advanced settings to fine-tune your allocations. Close the PAY ALLOCATION window. Note that your envelopes still have just your current balance in them. What happened to your expense allocations??? They only get added to your envelopes WHEN YOU GET PAID, and you enter your pay using the RECORD PAY toolbar button (or menu command). On payday, your check gets deposited into the bank and you will record this in Budget by clicking on the Record Pay toolbar button. Because you set up your allocations in advance, Budget is able to automatically distribute your pay to your envelopes according to your allocations when you click RECORD or you can make adjustments before recording the pay. Remember - At this point you are only telling the program how much to distribute to the envelope When You Get Paid. Your expense allocations will only get added to your envelopes when you record your pay. On payday, your check gets deposited into the bank and you will record this in Budget by clicking on the RECORD PAY toolbar button. Because you set up your allocations in advance, Budget is able to automatically distribute your pay to your envelopes according to your allocations when you click RECORD PAY NOW or you can make adjustments before recording the pay if your pay is variable or you want to make changes to the pay you are distributing. You're ready for normal useFirst, be sure to save your file and name it. See the saving your data file topic for more information. The budget is now set up with your current account balance distributed into all of your envelopes. You can now record a Check, Debit, or ATM, or record a Deposit, etc. by FIRST selecting the appropriate envelope and clicking the appropriate toolbar button to record the transaction. If you are using Budget without setting up pay allocations, you can deposit your pay by using a Split Deposit, and distribute it manually into your envelopes. If you've set up your pay allocations in Steps 4 and 5 above, when your pay day arrives simply click on the RECORD PAY toolbar button to record your pay to distribute it in each envelope as you defined when you created the envelopes. You can view your transaction history (similar to a check register) of any envelope or all envelopes at any time. You can click and drag to record a transfer between envelopes. Best of all, you can easily balance / reconcile your bank accounts when the bank statement comes each month. |