Budget Help
- Key Concepts
- Getting Started
- Work with Accounts
- Work with Envelopes
- About Envelopes
- Working With Envelopes
- Group Envelopes
- Moving Envelopes
- Delete An Envelope
- Creating Envelope Views
- Work with Income
- Record Transactions
- Work with Transactions
- Calendar
- Investments
- Calculators
- Import/Export/Sync
- Reports/Statistics
- Preferences
| How Budget Works |
| Check Register |
Working With EnvelopesCreate An EnvelopeCreating a new envelope or modifying an existing envelope can be done at any time. To create a new envelope use the Envelopes > New Envelope menu command. The creation of an envelope is determined by the front window. If the main window is in front, a new budget envelope will be created there. If a group window is in the front the new budget envelope is created in the group. If the investment window is in front, a new investment envelope will be created. In all cases the envelope is created with the name "New Envelope", and the envelope info window is displayed. To modify an existing envelope, first select it, then click the INFO toolbar button or use the Envelopes > Envelope Info menu command. Use the ENVELOPE NAME text field to change the name of the envelope. Envelope names can be any length but you should limit them to about 16 characters to prevent any truncation in the displays. Setting or Changing Envelope AppearanceClick the APPEARANCE tab to change how the envelope is displayed. 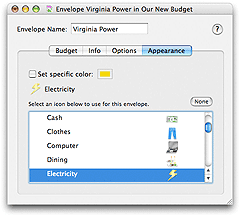
SET SPECIFIC COLOR - Set this option if you want to have this envelope display in a different color from the default envelope color. Click the color well to select the color to display. See the Preferences topic for more details on setting the default envelope colors. Envelopes may display a small icon in the bottom left corner of the envelope. To set an icon to display with an envelope, expand an icon pack in the table by clicking on the triangle on the left then select the icon in the list. To remove it click the NONE button. See the section Preferences for more details on icon packs. Setting or Changing Envelope InfoClick the INFO tab. 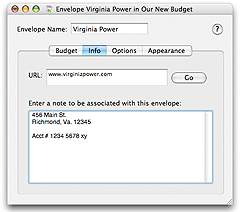
You can create a note for each envelope. The note may be any information you want to associate with this envelope. You can enter a URL for accessing a web site. Entering a URL enables the ENVELOPE's context menu (hold the control key and click the envelope on the main window) LAUNCH ENVELOPE URL command. The Envelopes > Launch Envelope URL command will bring up your default web browser and access the site specified. Setting or Changing Expenses and Pay AllocationsClick the BUDGET tab. 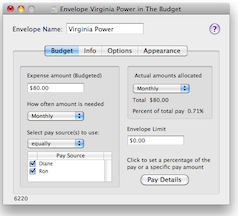
Set the amount you want to budget for this envelope into the EXPENSE AMOUNT field. Set the frequency of the expense in the popup menu. Basically this is how often you need the amount specified above. Set which pay source to use when paying the bill. Check the box next to each one you want to use. Use the selector if want either an equal amount or a proportional amount allocated from each pay. Set a limit for the amount of money the pay can distribute to this envelope. A zero amount means no limit. Once you have set this information Budget will determine the amount needed and automatically compute your pay allocations. The total amount allocated to your envelope will be shown in the ACTUAL AMOUNT ALLOCATED section and you can use the popup to display the amount for any time period. To see the amount for each pay that Budget has computed click the PAY DETAILS button to show the PAY DETAILS drawer.

Each pay for all of your defined pay sources will show in the PAY DETAILS table. You can change any amount in the pay details table by double clicking it and entering the amount. The ACTUAL AMOUNT ALLOCATED section will be updated to reflect the change. The UNALLOCATED column shows you how much is left in your pay that has not been assigned to an envelope. This is the same amount that will be placed in the "Available" envelope when you use the Record Pay command.
You can also set an allocated amount as a percent of your total pay amount. To do so use the bottom table in the PAY DETAILS drawer and set the percent next to the pay source. When a pay has a percentage set it is not computed with the expense amount. The percentage amount will be recomputed each time you change the amount of the pay source.
Setting or Changing Envelope OptionsClick the OPTIONS tab to set one of three options for this envelope.
|