Budget Help
- Key Concepts
- Getting Started
- Work with Accounts
- Work with Envelopes
- Work with Income
- Record Transactions
- Work with Transactions
- Calendar
- Investments
- Calculators
- Import/Export/Sync
Import:- Importing QIF/OFX Files
- Imported File Matching/Recording
- Manual matches for imported transactions
- Configuring import rules
- Reports/Statistics
- Preferences
Imported File Matching/RecordingAfter importing a file the transactions in the file can be matched to existing transactions in Budget. If a particular transaction has not yet been entered in Budget, a new transaction can be recorded that uses the imported transaction as it's basis.
The goal of the Import Matching window is to match all relevant imported transactions to transactions recorded in your data file. When you close the Import Matching window, matched transactions will be marked as reconciled in the Balance window and all unmatched imported transactions will be discarded. 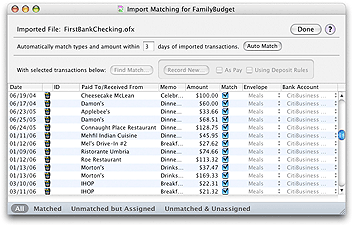
The Import Matching window contains a table of the imported bank transactions. The columns for ID, Paid To/Received From, and Memo are all optional and may not appear if no data of that type was imported. You can sort the table by clicking in the column headers for imported data. Filtering what is displayedAt the bottom of the window are four buttons that control what is displayed in the table.
Matching previously recorded transactionsWhen an imported transaction has a match, the matching transaction's bank account and envelope are shown in the Bank Account and Envelope columns respectively. Automatic matchingBudget attempts to automatically match imported transactions to previously recorded transactions. This matching is based on transaction type, amount, date, and the check ID (if given). The overall transaction type of withdrawal (Budget's check, debit, ATM, or charge transactions) or deposit (Budget's deposit or pay transactions) must match. Amounts and check IDs (if given) must also match exactly. The date of the imported transaction is used to determine a window of time to allow the match. If no matching transaction is found, Budget will attempt to assign the transaction to an existing envelope for recording. Budget looks at the imported "Pay To/From" and "Memo" fields for names of envelopes. If an envelope name is found in either of those fields that envelope is set as the assigned envelope for the transaction. See the section Assigning envelopes and bank accounts below for more information on assigned envelopes. You can run the automatic matching algorithm at any time by clicking the Auto Match button. To achieve a stricter or looser match, you can specify the number of days on either side of the imported transaction's date in order for the dates to match. Manual matchingIf Budget's automatic matching fails, you can assign matches manually. Select one or more imported transactions in the table, then click the Find Match... button. This will display the Find Match window where you can perform detailed searches of your previously recorded transactions to find a match for the selected transaction(s).
Breaking a matchIf Budget's automatic matching finds the wrong transaction, you can break the match by turning the checkbox off in the Match column for the imported transaction. This will leave the assigned envelope and bank account the same, but the imported transaction will no longer be matched to a recorded transaction. Assigning envelopes and bank accountsWhen there is no matching transaction, you can choose what bank envelope to assign an imported transaction using the relevant popup menu in the table. If you have multiple bank accounts in your document you can also choose what bank account to assign an imported transaction using the relevant popup menu in the table. The assigned envelope and bank account are used when recording a new transaction. After choosing an envelope for assignment, Budget will look at all of the unassigned transactions in the table. If there are any similar transactions, Budget will ask if you want to assign all of those similar transactions to the same envelope.
If the imported transaction has split information the envelope assignment popup will show "Split (Multiple Envelopes)" you may selected a single envelope to create a new single envelope Budget transaction. Likewise, if there is no split information in the imported transaction you may select "Split (Multiple Envelopes)" to split the transaction to multiple envelopes. Recording the transactionsSelect one or more imported transactions in the table that have an assigned envelope and bank account, then click the Record New... button. If more than one transaction is selected you will be given the choice of either recording the transactions as assigned or displaying the transaction editor for each of the selected transactions. If you select a single imported deposit transaction, you may be able to record that deposit as a pay transaction. The single deposit must be assigned to the same bank account that the pay source pays into, and must match the amount of the pay source. If both these conditions are met, the As Pay checkbox will be enabled. Turn on the As Pay checkbox and then click the Record New... button to display the pay entry window. If you have one or more deposit rules defined and select a single imported deposit transaction, you can record that deposit using a rule set. Turn on the Using Deposit Rules checkbox and then click the Record New... button to display the deposit rules window. |